It’s easy to create an event page and Facebook page for your business. Facebook makes it easy to promote your events and grow your business. You can now find potential customers who are willing to purchase your tickets and promote the event.
How to create event on Facebook
Facebook events offer many benefits and advantages.
- Facebook is the most used social media platform, engaging around 33% of the global population.
- Facebook offers unrivalled benefits for word of mouth marketing. Its algorithm shows your event to interested people and their friends all over Facebook. This way your event can reach many more people and gives you the opportunity to expand your audience.
It’s easy to create an event on Facebook. We’ll first show you how to create a Facebook event. Next, we will show you the best practices for creating events.
How do you create an event on Facebook
- Navigate to your page and click the “events tab” link in the left-hand sidebar.

Create an Event
Click on any of the “Create Event” buttons that you see on your screen. You can choose whether the event will be published online or offline.
It should be credible and attractive.
Facebook provides all the information required for an event. You first need to enter each element. You can, for example, add a cover or video to the default photo by clicking “change photo/video” and dragging an image from your computer.
A cover photo that is related to your brand will increase the credibility of your event.
Facebook will ask for information. Fill in the information. Upload the banners and images you need to make your event more credible and attractive. To create banners for your event, you can use Canva.
Please select whether you would like to make a public or private event on Facebook.
Information bonus: You can make a private event public by changing its privacy settings. However, public events cannot be made private.
Private Facebook event:
These guidelines will help you decide whether you want to host a private or public event.
Only those who have been invited to a private event can see it if it is posted to your feed. Only those who have been invited to the event will be able see it. This means that no one from your network will see the event unless they are invited.
If the admin permits it, guests can invite their friends to an event via Facebook. They can also view the event page if they are invited. You cannot also share a private Facebook party; you can only invite others to view it.
Public Facebook Event:
Anyone can see a public event, whether they are on Facebook or not. They will see information about your event, including photos, discussion, videos and descriptions. You may also find the event in searches.
Are you looking for a way to make a Facebook event more private?
A Facebook profile can only create private events. If you create an event on the Facebook Business page, all Facebook business pages are public by default.
2. All details should be added

No matter if you decide to host a private or public event, the following information is required:
- Name of your event
- A cover photo or video of an event
- The location
- You can choose to create recurring Facebook Events.
- Your event’s date and time
- Any co-hosts (e.g., venue hosting your event).
You can add SEO information to public Facebook events such as description, category and keywords. This will make your event more searchable.
If you are running an online art and craft workshop, for example, you might add keywords like “arts”, “craft”, and “online workshop.” This will make it easy for people to search online for “online arts and crafts workshop” and increase ticket sales. If your event takes place at a physical location, include that information in your keywords.
3. Payments and setup of tickets
Once you have all of the details for your event compiled, you need to set up ticketing so you can take payments directly through Facebook. There are two options.
Option 1: Use Direct payment links.
Event organizers often add their PayPal or Stripe links to their event on Facebook. This is not the best way to ensure the best results.
Facebook will not allow you to create ticketing for free events, online events or hybrid events that are very popular (e.g. webinars, conferences). You will lose out on ticket sales from your attendees and valuable data you can use to market your next event.
You cannot separate payments for multiple events or ticket options if you host multiple events. This can cause confusion.
Then, what should you do? This is the best choice.
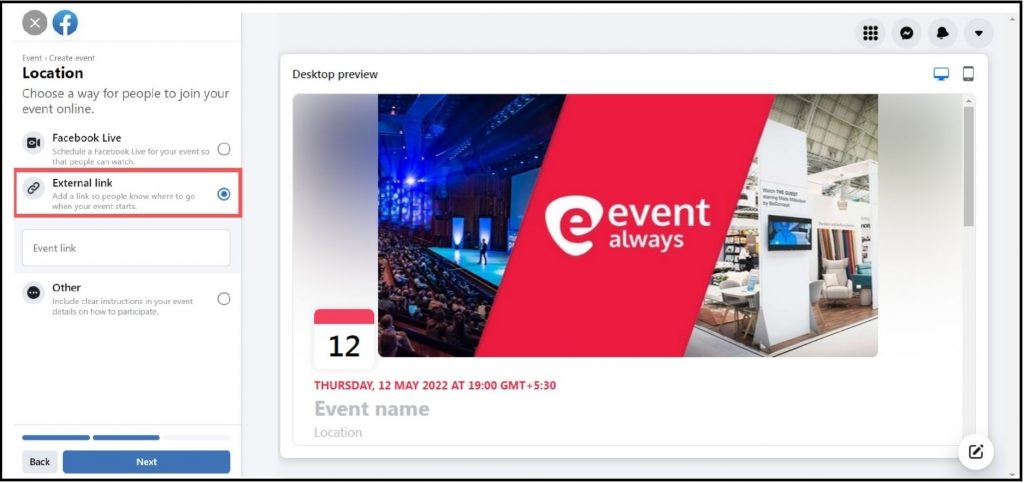
Option 2. (Recommended).: Use the Event Link from ticketing platforms.
On a dedicated platform for event discovery, you can create tickets and pay for your event. This will allow you to delight yourself with an organized ticketing system that provides you with all the analytics as well as real-time marketing insight about your attendees and events to maximize your ticket sales.
Eventalways is a ticketing platform that allows you to create your own event landing page and ticket links to direct payments. You can also add them on your Facebook page. It’s very easy and quick. You can create an event on Eventalways and activate ticketing and payment. Then, you can add the ticket link to your events via Facebook.
Eventalways offers all the benefits of selling tickets online
This will make it easy for your customers to book tickets and increase your sales.
4. Final details and guest list
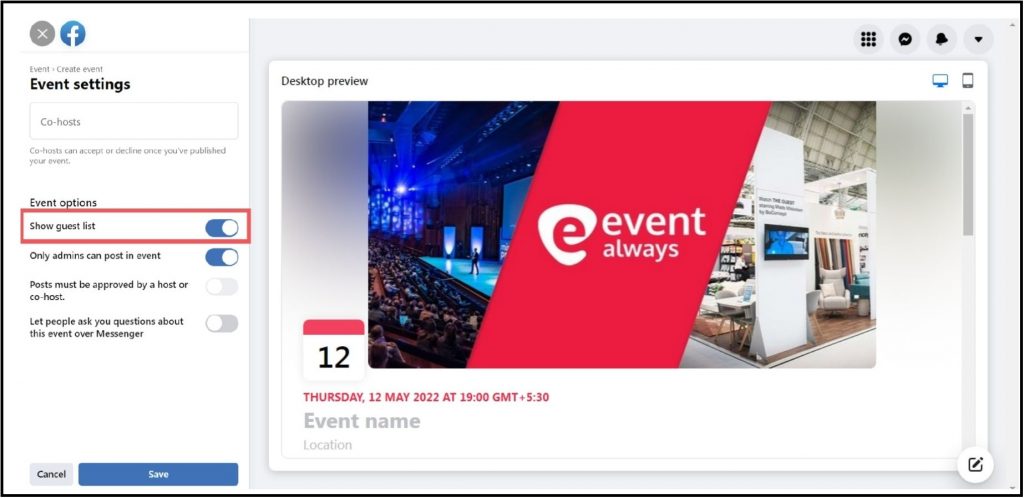
After you have filled in the date and time information, scroll down to the last few fields. Other pages and people who are involved in the event are called co-hosts. You can add a page to the events tab.
Final, determine what permissions you want guests to have, so they can post on the event wall for the complete guest list.
It’s important to know that you can hide your guest list from the public and other attendees by unchecking “Display Guest List” box.
5. Publish an Event
Click “Publish” to make your event live.
Next?
You can create an event on Facebook, but that’s just one step to making your event a success. Next, reach your target audience.
To target your audience, follow the steps below:
Facebook paid ads can be run for better results.
Facebook ads allow you to target specific users for your event requirements. Facebook ads can be used for a variety of purposes, including increasing engagement with an ad or directing people to your website and generating more leads.
Targeting people based upon their behavior and interests can help increase the reach of an event.
The Facebook ads manager offers additional features.
- Create lookalike audience
- Targeted interest
- Behavioral targeting
- Retargeting ads
This is where most organizers make mistakes. They boost an event and pay less money.
It is best to manually add your creatives and set up targeting. For the best results, organizers can outsource this work to marketing professionals.
This offer is by Eventalways.